Concrete Batching Machine Setup: 8 Steps to Precision Weighing
An improperly installed batching machine is the #1 cause of recipe deviation. Learn how to calibrate your aggregate dispenser for maximum accuracy.
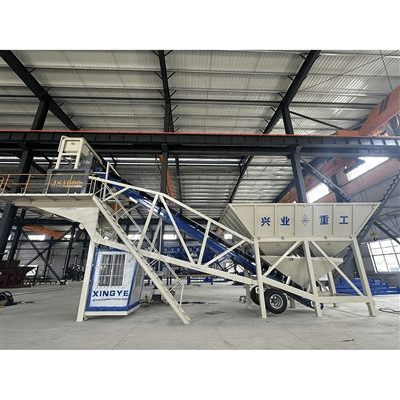
In high-precision concrete production, the batching machine (aggregate dispenser) is the gatekeeper of quality. Whether you are operating a PLD800 or a heavy-duty PLD4800, the transition from "delivery" to "operational" requires rigorous technical precision. Poor installation doesn't just lead to inaccurate mixes—it can lead to catastrophic load cell failure and costly project delays.
The Cost of Improper Installation
Small errors during the setup phase often manifest as chronic operational headaches in humid or high-dust environments.
| Installation Error | Technical Consequence | Business Impact |
|---|---|---|
| Unlevel Foundation | Uneven material flow & sensor drift | Inconsistent concrete strength |
| Bolts left on weighing hopper | Zero sensor response | Total production halt |
| Poor Grounding (>4Ω) | Static interference/Surge damage | Fried batching controllers |
| Incorrect Neutral Wiring | Short circuits/Component burnout | Expensive electronic replacement |
8-Step Commissioning Protocol
Follow this engineering checklist to ensure your batching machine meets international standards for accuracy and reliability.
1. Inventory & Inspection
Upon arrival, cross-reference all technical documents and accessories against the packing list. Inspect the JS-series mixer compatibility points and ensure no structural deformation occurred during sea freight or inland transit.
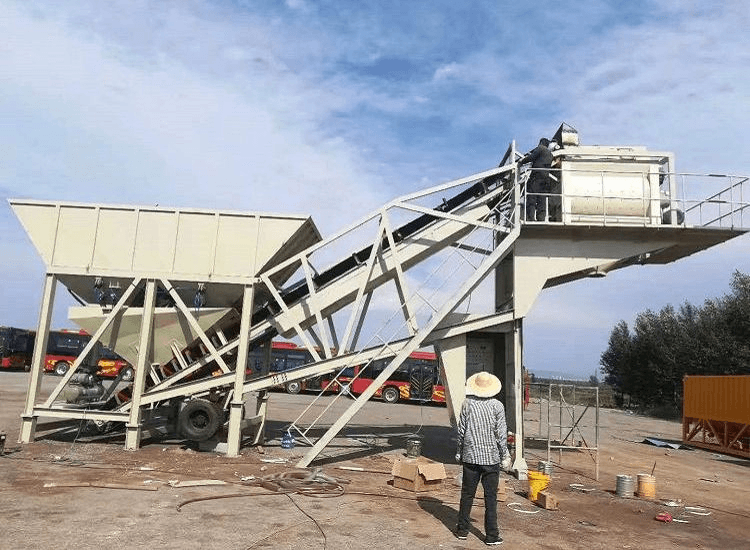
2. Foundation Integrity
The user must prepare the concrete foundation strictly according to the provided engineering drawings. A level base is non-negotiable; even a 1-degree tilt can compromise the gravitational accuracy of the weighing sensors.
3. Leveling & Positioning
Once positioned, use a spirit level to verify that each mechanism—especially the belt conveyors and hopper frames—is perfectly horizontal. This prevents lateral belt wear and ensures "dead weight" does not skew sensor readings.
4. Sensor Activation
Install the high-precision load cells only after the main frame is secure. Crucial: You must remove the shipping/fixing bolts from the weighing hopper. These bolts protect the sensors during transport but will prevent the hopper from "floating" for measurement if left in place.
5. Mechanical Verification
Manually check all transmission parts. Ensure the discharge gates move freely and that all connection bolts are torqued to specification. Lubricate pivot points before the first power-on.
6. Electrical Integration
Wire the system according to the Batching Controller Manual. This includes the main power, individual motor leads, sensor shielded cables, and remote control interfaces. Keep signal cables separate from high-voltage lines to prevent EMI (Electromagnetic Interference).
7. Empty Load Testing
Perform a "dry run" to verify motor rotation directions. Incorrect phasing on a conveyor belt can cause immediate belt damage or material backflow.
8. Simulated Cycle Calibration
Run a simulated batching cycle. Set small weighing targets for various aggregates (sand, stone, gravel) to verify that the logic controller correctly manages the "fast" and "slow" feeding phases for maximum precision.
Critical Safety & Environmental Precautions
To ensure a 10,000+ hour MTBF (Mean Time Between Failures), especially in the harsh climates of the Middle East or Southeast Asia, adhere to the following:
- Electrical Isolation: A dedicated knife switch must be installed between the main power supply and the electrical cabinet for emergency lockout/tagout.
- Grounding Requirements: The batching controller must be grounded with a resistance of ≤ 4 ohms. In dry, sandy regions, specialized grounding salts may be required to maintain this threshold.
- Wiring Safety: Never confuse the neutral line with the ground line. This is the most common cause of controller failure during site setup.
- Climate Protection: While Xingye machinery is built for rugged use, the batching controller (the "brain") requires a sun-proof, rain-proof, and dust-proof enclosure to prevent thermal drift in the electronics.
Need a detailed CAD foundation drawing for your specific PLD model? Contact Xingye Machinery’s engineering team for technical support and localized installation advice.
Related Posts :